Learn How To Draw A Locomotive Or Train Quickly
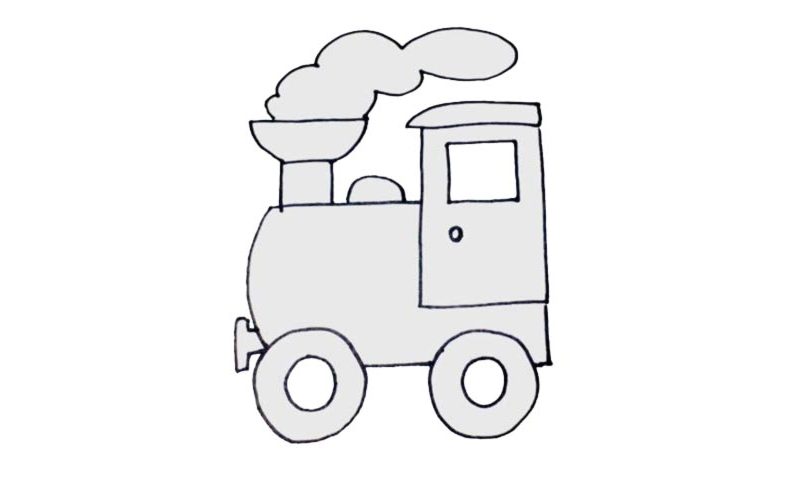
This is a very basic composition, nothing fancy. Follow my instructions closely and you’ll end up with an awesome drawing to boast about. We begin this how to draw a Locomotive Or Train tutorial with the driver’s cabin (00 min 08 sec). You’ll need a rectangle just like you see in the video; next, add a cute “roof” on top of it (00 min 16 sec). Happy with everything?
Ok, then go ahead and draw the window in the top corner (00 min 21 sec). Looks a bit like a regular door, doesn’t it? Don’t forget about the tiny handle. The wheel on the right is the next step (00 min 32 sec). All you’ll need for it – a small circle inside a bigger one. The second wheel looks exactly the same (00 min 45 sec). Connect them to each other with a short line. Once that’s done, move on to the next stage of this how to draw a Locomotive Or Train tutorial.
Use a combination of a straight and a curvy line to complete the main body (00 min 56 sec). We’re almost done with this lesson. Add a half-circle right next to the cabin (01 min 11 sec). The last step is the chimney and the smoke slash steam coming out of it (01 min 15 sec). You’ll be done with that in a matter of seconds. If some parts look bad, don’t be afraid to go back and fix them.
Before you learn how to draw A Locomotive Or Train, did you know?
To put it in simple terms, the Locomotive is the driving force behind any train. It’s got an incredibly powerful engine under the hood and is capable of pulling all the heavy weight. Usually, Locomotives pull trains from the front, but that’s not a universal rule.
These days, we’ve got them pushing and pulling from the back, the front, or even from both ends to provide more power. As for the very first operational Locomotives, they came around in 1802 and used to work on steam. To this day, they are very much useful and irreplaceable.