Learn How To Draw A Chameleon Quickly
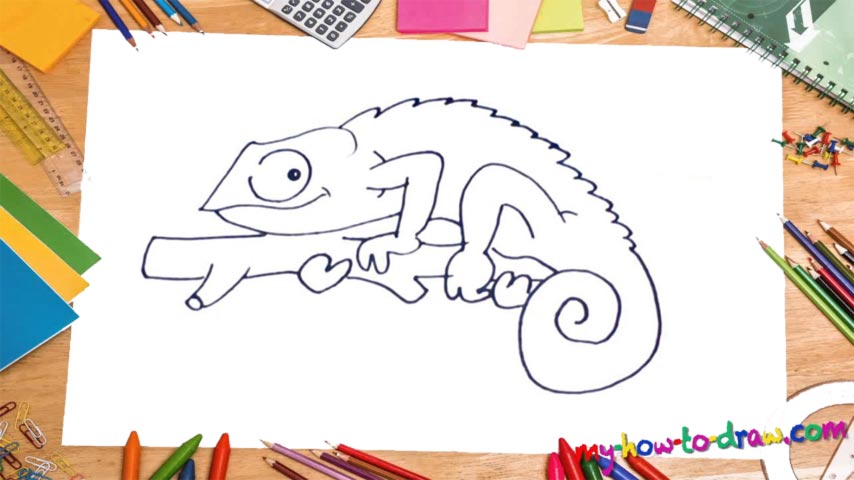
As always, we begin with the head and that cute mug (00 min 06 sec). The mouth kind of divides the face into two parts; the eye sits in the upper half (00 min 18 sec). It takes up almost all the space there. The pupil is located in the lower right corner and looks cunning. If you’re satisfied with it, go ahead and add a wavy line for the back, the next step in this how to draw a Chameleon tutorial (00 min 27 sec).
Please notice that when it turns into the tail, the line becomes curvy, as opposed to the zigzag-style line in the upper part (00 min 40 sec). The tail actually resembles the infinity sign a lot. Alright, now it’s time to work on the legs (00 min 52 sec). The one closest to the head comes first. Take a good look at the final result in my how to draw a Chameleon video to see that the animal is holding on to a bough.
Keep that image in your head while drawing the legs to make everything look more realistic. We can only see the claws of the rear limbs, while the legs on the front are right in your face (01 min 27 sec). The bough is nice and simple. The most important thing here is to get the angle of the legs right.
Before you learn how to draw A Chameleon, did you know?
We, the humans, really like to exaggerate things, and there are numerous books, movies and TV shows dedicated to Chameleons with otherworldly abilities. In some comic books, they can turn into regular men and women like us and even control minds from a distance.
In reality, though, they are great “spies” and can blend in no matter the surroundings. Plus, they can quite literally “drop” their tales whenever their lives are threatened and leave the scene without them. Later, Chameleons grow them back. If the medics were able to learn how they do that, they could possibly have a huge breakthrough!