Learn How To Draw Trousers Or Pants Quickly
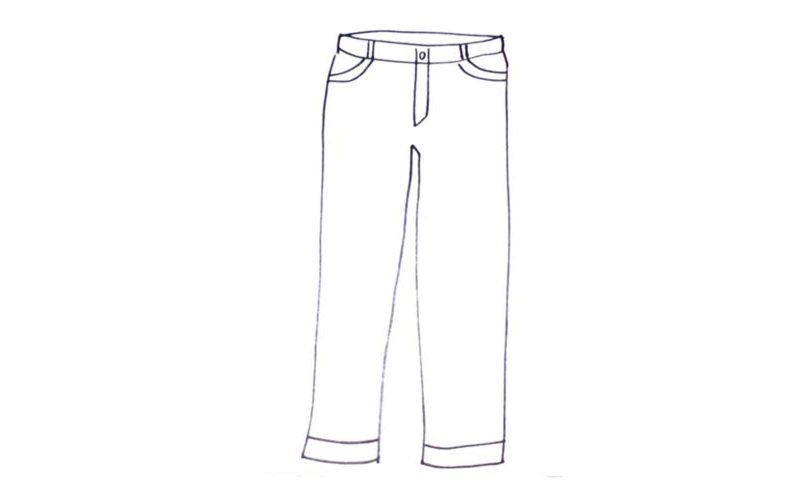
This is a very easy tutorial, one that you’ll be able to master even without our professional help. However, if you truly want to learn how to draw Trousers Or Pants, I suggest you take all the help you can get :). We start by creating two identical vertical lines (00 min 05 sec). They cover the left and the right sides of our pants and reach the very bottom of the paper.
Once they are in place, use a series of similar horizontal curves to draw the belt (00 min 19 sec). The pockets are very easy and straightforward and you’ll need two primitive lines for each (00 min 42 sec). The button in the middle of the belt and the zipper (the crotch, to be exact ) are the next steps (00 min 50 sec). Alright, now that we’ve got all that out of the way, it’s time to get to the final stages of this how to draw Trousers Or Pants tutorial.
All that’s left to do is define the legs by using two opposing vertical lines (01 min 01 sec). Start right below the crotch and reach the very bottom with your lines. Don’t forget about the folds in the lower corner (01 min 15 sec). Ok, now you’ve got a proper pair of male trousers in your hands. If you want to turn this drawing into female trousers, you’ll need to make the curves a bit more round and narrow.
Before you learn how to draw Trousers Or Pants, did you know?
We can’t imagine our lives without these pieces of clothing, but our ancestors didn’t have the luxury of trousers. They had these crazy outfits instead that covered the whole body. Today, when fashion is one of the biggest industries in the world, the variety is truly astonishing.
You’ve got different colors, different shapes, trousers with holes in them, with metal attachments, and everything else in between. Oh, and by the way, before the 50s-60s, only fellas used to wear pants. For the ladies, it was something out of the ordinary. Well, not anymore!