Learn How to draw Olaf Santa Claus Quickly & Easily!
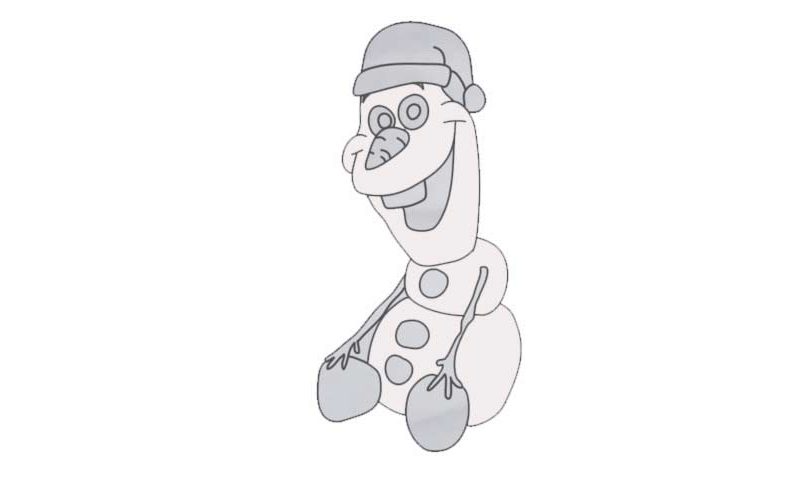
It’s only right that we begin this video guide with the snowman’s nose (00 min 28 sec). It’s just a mid-sized carrot. The eyes sit right on top of it and are one of the easiest steps in this how to draw Olaf Santa Claus tutorial (00 min 40 sec). Four circles in total – that’s what you’ll need for the eyes. Before you get to the rest of the face, add the bottom of the hat first (01 min 09 sec).
Then, put in a huge horizontal curve for the top of the mouth. And after you go ahead and draw two vertical lines that meet at the bottom of the paper, your drawing will start to look like a vase (01 min 43 sec). The poor fella has only one tooth, but that doesn’t stop him from being totally admirable. The tiny circle in the top right corner is for the hat (02 min 41 sec). Connect it to the rest of it and let’s move on.
The final stage in this how to draw Olaf Santa Claus tutorial, the body, is a bit shorter than the head (I mean in the physical sense). And, it’s got fewer details. Add the right hand (which is a stick) first. Then, create the left one that looks exactly the same (03 min 45 sec). They are connected to the first “block” of the body. The legs are very simple (04 min 10 sec). Same goes for the main part of the body Draw one circle (button) in the upper block and two in the bottom block and that’s it (04 min 52 sec).
Before you learn how to draw Olaf Santa Claus, did you know?
If you had a chance to check out Frozen, an incredibly popular and commercially-successful animated movie, then you probably remembered Olaf, one of the main characters. This guy is a snowman with unique abilities, a joyful personality, and a very good heart.
Elsa and Anna built him together back when they were both little kids and BFFs. We know that when the siblings grew up, they turned into great enemies. But Olaf still remembers how close they used to be and carries that love, that ever-glowing light inside of him.