Learn How to draw Olaf Easter Bunny Quickly & Easily!
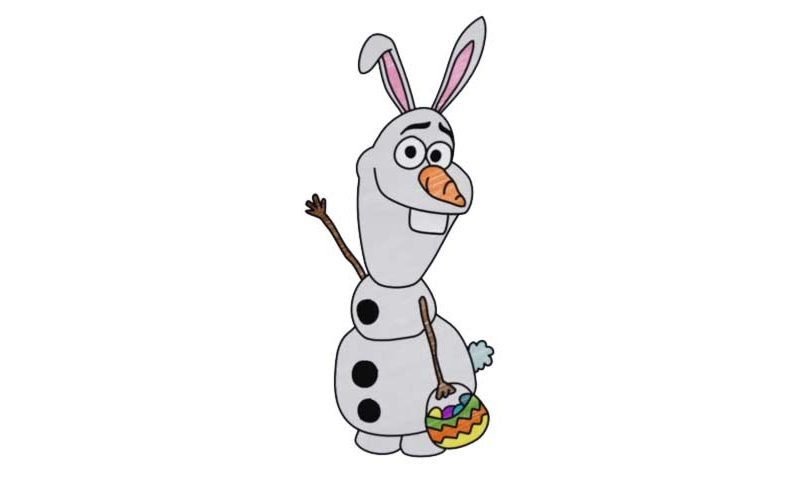
He’s tall, hilarious, and has a carrot for a nose. Plus, he’s an animated snowman and can walk around freely. Isn’t that awesome?! In this tutorial, we’ll try to learn how to draw Olaf Easter Bunny the right way. That means starting with the rough sketch and working our way up from there. Begin with a circle on top (00 min 22 sec). Together with the oval shape right below it, that circle covers our character’s head.
The next two shapes represent the body of Olaf (00 min 43 sec). Once those are in place, add the legs (two tiny circles at the very bottom of the paper) and two long-yet-thin lines for the hands. That’s it for the intro, ladies, and gentlemen. Now we move on to the clean drawing and pay attention to every single detail. I really like to start with the eyes and you should do the same (01 min 11 sec). The nose – the carrot – comes next.
If you’re happy with those, add the eyebrows (a combination of two simple curves) and use the guidelines to define the shape of the head and the neck (01 min 48 sec). The cute ears are the next step of our how to draw Olaf Easter Bunny tutorial (02 min 28 sec). They are very simple and are made up of several repetitive curves. Once you finish the right hand holding that bag, you’ll be almost done (02 min 52 sec).
The rest of the body is the easiest part and you’ll basically have to go over the light strokes and add three buttons (03 min 28 sec). Same goes for the legs and the left hand: just use darker strokes on the rough sketch and bring this home!
Before you learn how to draw Olaf Easter Bunny, did you know?
As one of the most memorable characters from a 2013 hit animated movie – Frozen – Olaf is very popular to this very day. He used to be a motionless snowman. But, when Elsa enchanted him, this hero turned into a big fan of summers and everything hot, even though he can’t be exposed to any of that.