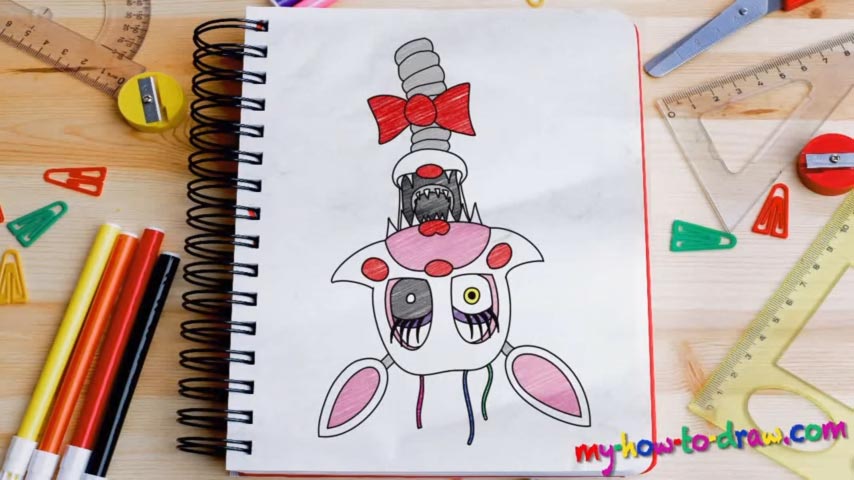
Learn How to draw Mangle FNAF Quickly & Easily!
If you want to get everything right and end up with a drawing that looks almost exactly the same as the one in the video, make sure to follow the instructions in this how to draw Mangle FNAF tutorial. A rough sketch is a must. So, start there (00 min 22 sec). Two circles and a bunch of curvy lines – that’s pretty much all you’ll need for the guidelines.
Once those are in place, get to the clean drawing (00 min 49 sec). The nose and the upper jaw come first (00 min 52 sec). After you put in the lower one, add the scary teeth. The ones in the foreground are bigger and more in-your-face. The ones in the “background” are smaller but they look even more sinister (01 min 57 sec). If you’re happy with the how to draw Mangle FNAF tutorial so far, let’s finish the head.
Use the circle at the top and the curves we drew in the beginning and create an extra-smooth outline for the creature’s head (02 min 32 sec). Did you think the teeth were the creepiest part? No, it’s actually the eyes (03 min 05 sec). And those eyelashes make them look truly blood-chilling. The eyes are almost identical.
Before moving on to the final part of the how to draw Mangle FNAF tutorial – the neck – don’t forget to take care of the ears (04 min 57 sec). The one on the left is bigger, and there are wires between them. Alright, now it’s time to draw the bowtie (06 min 04 sec). The neck is just one long line that looks like a spring.
Before you learn how to draw Mangle FNAF, did you know?
The creators of this animatronic were inspired by Foxy and wanted to make a more children-friendly version. But, instead, they ended up releasing yet another scary-as-hell “robot”. Still, he’s pretty different and doesn’t have that hook that used to put the fear of God into the hearts of both the kids and the grown-ups.