Learn How to draw Nightmare Freddy – FNAF Quickly & Easily
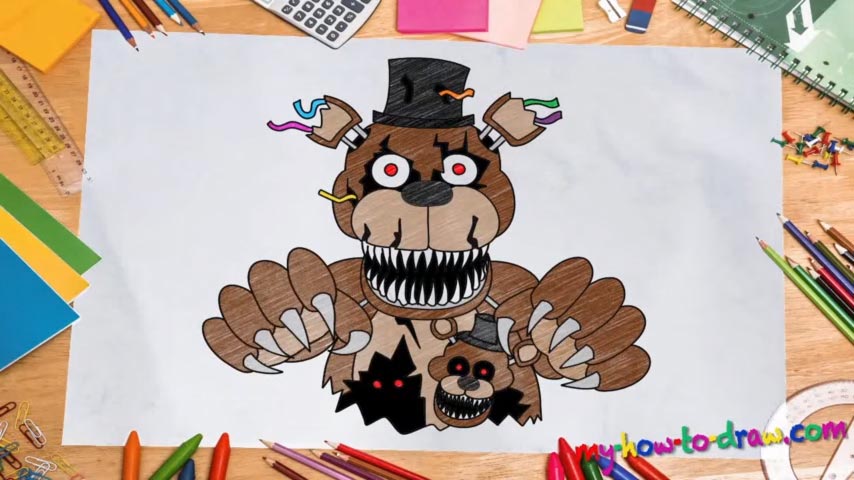
Before we start, I just wanted to say that this drawing is pretty sophisticated and will take some skills to pull it off. As always, we begin with a rough sketch that will guide us later during the how to draw Nightmare Freddy tutorial. Ok, first of all, create a circle in the middle of the paper (00 min 37 sec).
Next, draw another one above it that overlaps. After you create the straight vertical and the curvy horizontal lines, the head will be almost done (00 min 54 sec). Don’t forget about the ears, though. The body is relatively simple. Draw a half-circle from the bottom of the paper (01 min 13 sec). The scary hands are just a combination of an oval shape and several pointy lines (01 min 22 sec).
They are pretty much identical, by the way. The final part is the image on his chest (02 min 07 sec). Now we can move on to the next stage of this how to draw Nightmare Freddy tutorial. Use a marker and start with the nose (02 min 58 sec). Then, after drawing the crack, take care of the eye (03 min 15 sec). Both eyes look the same, and so do the cracks around them.
If you’re happy with what you’ve got so far, move on to the scary mouth (05 min 21 sec). It’s pretty easy and is basically a number of pointy teeth. Try to make the shape at the bottom of the mouth as curvy as possible (07 min 41 sec). The hat will make our hero look even scarier than he already is (07 min 51 sec). The ears are easy, so, let’s move on to the body.
This part of the how to draw Nightmare Freddy tutorial is relatively easy. As mentioned above, the hands are identical. Start with the claws on the left one (10 min 07 sec). Once they’re all in place, add the fingers. Do the same with the right one. That bunny on his chest is basically a tinier form of Freddy (12 min 52 sec). Don’t forget about the scary shadow before you get to coloring (15 min 42 sec).
Before you learn how to draw Nightmare Freddy – FNAF, did you know?
A monster like that one will probably haunt you in your dreams. It’s pretty scary even before you put the right colors in. But one thing is certain: if you master this video, you’ll turn into quite a capable artist. So, believe in your own skills and don’t back down!