Learn How to draw A Stage Quickly & Easily!
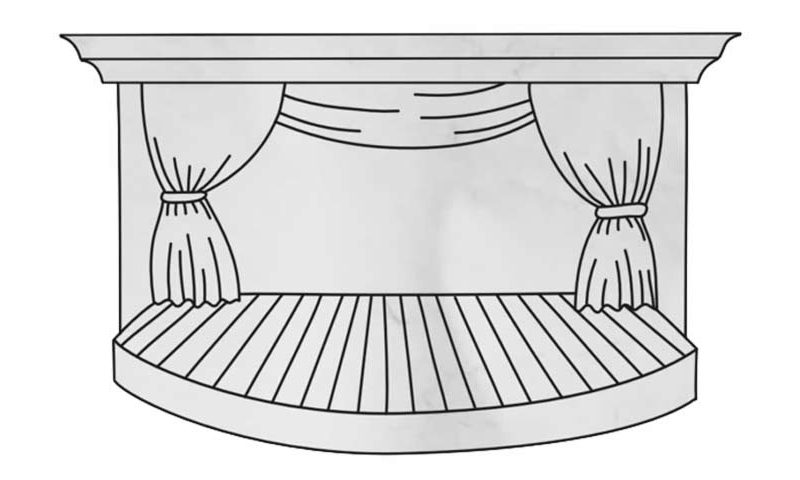
At a first glance, you could think that this is a simple drawing, but it’s actually not. Those lines need to be accurate, not to mention the proportions should be right. Start this how to draw a Stage tutorial with creating a straight horizontal line in the upper corner (00 min 28 sec). Next, draw the left curtain. Make it look big and majestic, just like in a real theater.
The shape of it is almost that of an hourglass. See those vertical lines that go up and down (01 min 01 sec)? They add extra realism to the curtains. The right one is pretty much identical; so, we won’t focus our attention there. After you’re done with the part of the curtains right below that line in the top corner, move on to the next step of this how to draw a Stage tutorial – the foundation (01 in 35 sec). Be extra careful to get the angle right.
In order to make it look like a 3D model, add a curvy line at the bottom and a straight one right below the curtains like you see in the video. We’re actually almost done. Go ahead and finish the upper part of this composition. You’ll need two identical “shelves” at the top (02 min 03 sec). The final thing to do is to draw a series of vertical lines on the stage. It’s very easy, but the distance between the lines needs to be right.
Before you learn how to draw A Stage, did you know?
For the regular audience, the stage is a grandiose thing. For the artists, it’s their second home. I want to point out that people have always felt the need to speak up and/or to show their talents to others. And stages are a perfect “platform” for that.
The musicians, the actors/actresses, the inspirational speakers, and even the politicians – they all use the stage to deliver a speech, to lift our spirits and to prove that they have something important to say to the rest of the world.