Learn How to Draw An Angel Quickly & Easily!
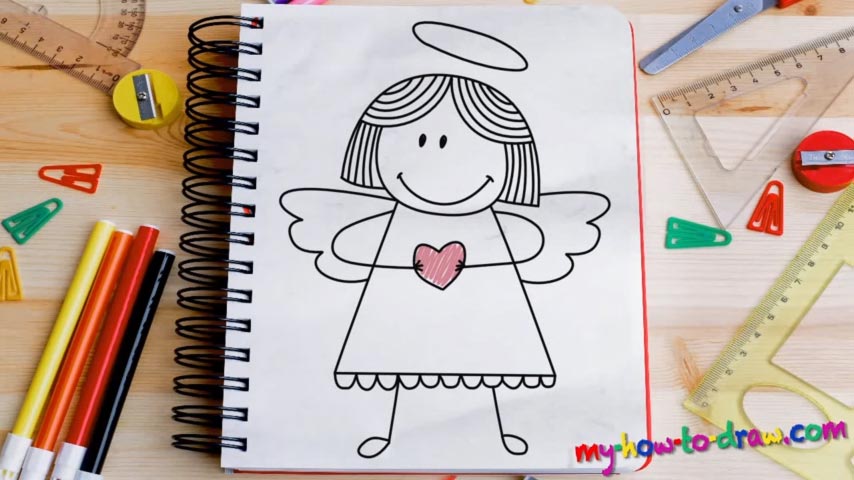
This is one of those drawings that even the beginners will be able to handle. At the same time, it looks good and will teach you some basics. Yep, it’s a win-win situation! The first thing we’re going to do in this how to draw an Angel tutorial is create a half-circle in the top corner of the paper (00 min 27 sec). It represents the girl’s hair. Use two smaller curves to accentuate the hairlines and a bigger one to outline the face.
The facial features are very simple: we’ve got two tiny dots for the eyes and one curve at the bottom for the mouth (00 min 50 sec). Are you happy with the head so far? If the answer is yes, let’s move on and handle the body. You’ll need to draw a triangle just like you see in the video – that’s actually it. Add those zigzaggy lines at the bottom of this shape to make it look more like a dress (00 min 59 sec). Those super-slim hands holding a heart come next (01 min 09 sec).
The legs are identical and are just as thin as the hands (except for the feet, of course). The final part of our how to draw an Angel tutorial are the wings (01 min 35 sec). Once that’s done, go ahead and add additional curves inside that hair to make it look more realistic (01 min 47 sec). Oh, and don’t forget to add that halo on top of her head before you say goodbye.
Before you learn how to draw An Angel, did you know?
Nobody has ever seen an angel, which means from a scientific point of view, they don’t really exist. However, the majority of the planet’s population believes in them. These otherworldly creatures usually live in the Heavens and only visit the Earth on rare occasions.
We learn about them from religious books and mythologies. They are the messengers of God and serve as some sort of “liaisons” between the Creator and us, the humans. Angels live forever and have the ability to make miracles happen.