Learn How To Draw A Snowman Quickly & Easily!
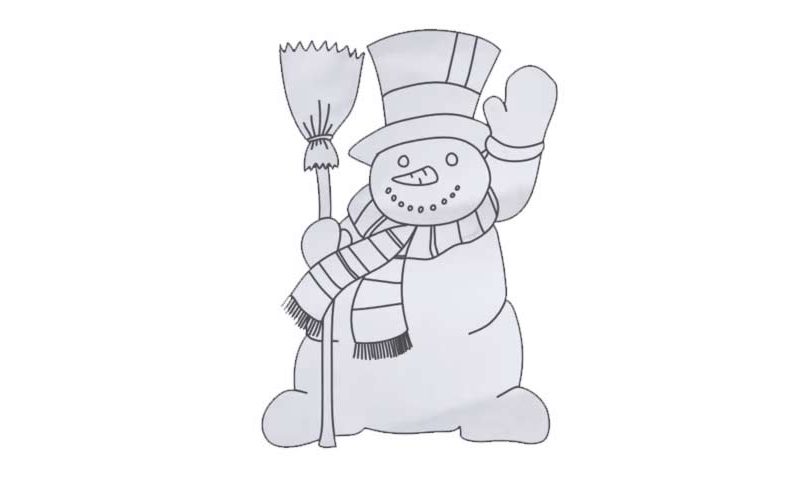
Start with an oval-like shape in the top corner for the head (00 min 28 sec). Next, add all the facial features. Those include the nose, which is a carrot, two tiny circles right above it for the eyes and the mouth. Use a series of even smaller circles to form the mouth (00 min 53 sec). If everything looks good, move on to the next stage in this how to draw a Snowman tutorial – the right hand (01 min 15 sec).
It’s very simple – the hero has a glove on, which means you won’t have to worry about the fingers. That fancy hat follows (01 min 35 sec). It fits the picture perfectly and consists of a number of primitive curves. Same goes for the scarf on its neck (02 min 05 sec). Use several short straight lines for the tips. The body – the biggest part of this how to draw a Snowman tutorial, is actually also the simples part (02 min 52 sec).
All you’ll need is a bunch of vertical and horizontal lines. The broom is a bit tricky (03 min 43 sec). But if you follow the video closely, it will be a piece of cake. Make sure its top is nice and zigzaggy. And before you finish this drawing, go ahead and add some details on the scarf like I did. Ok, that’s it!
Before you learn how to draw A Snowman, did you know?
Without a doubt, these man-made buddies are one of the most popular Christmas/winter time symbols. The kids really love to make snowmen whenever it starts to snow, and the grown-ups use this as a great way to bond with the little ones and have a great time.
Unfortunately, people in the tropics and most of the African countries have never seen snow and can’t build these awesome “creatures” even if they want to. The Russians, the Canadians, and the citizens of the rest of the cold-ish places are lucky that way!